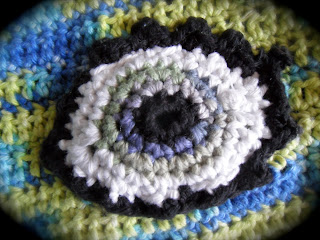
I've decided to use this blog to share my freeform crochet patterns for unusual little things; like today's piece.
This is a simple little evil eye/eyeball design, which could be sewn onto anything you like, or used as a scrubbie in the kitchen, hallowe'en gifts etc. If you make it as a scrubbie remember to use 100% acrylic yarns though or it won't work so well...
Here's how to make it, I will assume you know the basic crochet stitches, & please note this pattern is written in UK crochet terminology. (UK & US terminologies/stitch names are different; for this project to work make sure you have the right stitches. For a quick reminder, when I say 'dc' I mean a US sc; htr = hdc etc etc.
You will need:
Oddments of yarns in black, blue (or whatever colour you wish the iris to be) & white. I used 100% recycled cottons for the examples, & there is a variation with or without eyelashes/eyeliner ;)
Your favourite sized crochet hook, I used a 5.5mm but I crochet pretty tight so most people may be happier with a 3-4mm. Depends also what size you want the finished eye to be.
This eye is worked without turning the work at any point; it is done round by round, with shaping in the later rounds to create the eye outline.
Onto the instructions:
Round 1: Using black, make an adjustable loop; (there's plenty of instructions for this online without me telling you exactly how to do this, it's easy & if you've done Amigurumi before you'll know what to do).
Make 12 dc into ring, join w sl. st. (12 sts). fasten off black.
Round 2: Join in iris colour (blue etc), ch 1 (counts as first dc), 1 dc into same st; 2 dc into ea. st all the way around circle (24 sts).
Round 3: Ch 1 (counts as first dc). 1 dc into same st; *1 dc into next st, 2 dc into following st* Repeat from * all round circle (36 sts) Fasten off iris colour.
Round 4: Join in white, ch 2 (counts as first htr); 1 htr into same st, dc into each of the next 13 sts, htr into next st ch 1 htr into following st, dc into ea st to finish round, ch 1,j oin to 1st st w sl st. (36 sts plus 2 ch sp)
Round 5: Ch 2 (counts as first htr), dc into ea. st until next htr reached, htr in this st, ch 1, htr in following st, dc in ea st until last, htr in last st, ch 1, join w sl st. Fasten off white.
For eyelashes continue to round 6.
Round 6: Join in black. ch 1 (counts as first dc), 1 dc in next 2 sts, ch 2, join into same st w sl st (1 eyelash made). Continue around making eyelashes every 2nd st until top of eye is reached, then 1 dc in ea st (& 1 dc in ch 1 sp) until you've reached the opposite side of the eye, then do more eyelashes as you wish (it's fairly freeform at the eyelash part but quite simple so you'll get the hang of it.
For bigger eyelashes ch 3 or more at each lash (or picot, which is technically what they are!).
Fasten off black, weave in/tie off ends, press lightly using a cool iron. Stick onto your jacket, a top; a bag; or onto whatever you want, give it to a friend or wash your dishes with it ;)

Enjoy!

No comments:
Post a Comment